
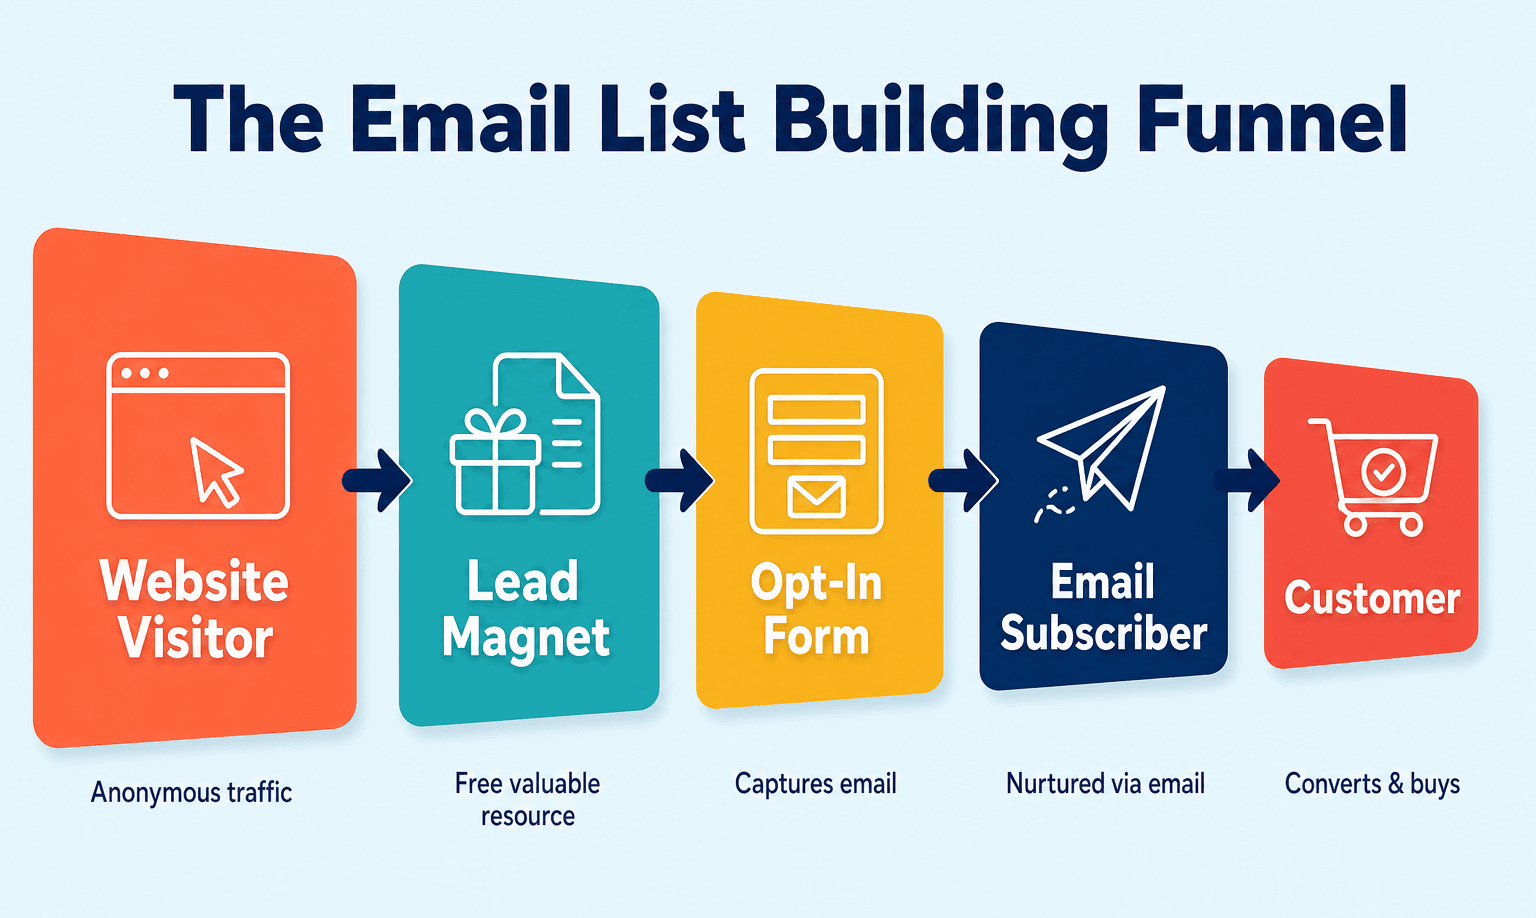
If you have a website and no email list, you are leaving money on the table every single day. This email list building guide is designed to take you from zero subscribers to a functioning, growing list, even if your site gets little traffic right now.
Unlike social media followers, your email list belongs to you. Algorithms do not control who sees your messages. You send an email, it lands directly in your subscriber’s inbox. That is a direct line to your audience that no platform update can take away.
Whether you are a beginner launching your first online business or an established entrepreneur looking to scale, the strategies in this guide will give you a clear, step-by-step system to grow your email list sustainably.
Why Every Business Needs a Solid Email List Building Guide
Before diving into tactics, it helps to understand why email beats every other channel for building an audience.
The average return on investment for email marketing is $36 for every $1 spent, according to Litmus research. That is higher than SEO, paid ads, and social media combined. The reason is simple: email subscribers have already raised their hand and said they want to hear from you.
Here is what that looks like in real numbers. A list of 1,000 engaged subscribers, emailed weekly, can generate $1,000 to $3,000 per month in revenue through affiliate offers, digital products, or services. A social media following of 10,000 might generate far less because organic reach on most platforms sits between 2% and 5%.
The core advantage of email is ownership. Your Instagram account can be suspended. Your Facebook page reach can collapse overnight. Your email list is an asset that travels with you across any platform change.
Key takeaway: Email is your most valuable marketing asset because you own it, and it consistently outperforms every other channel in revenue per contact.
Step 1: Choose the Right Email Marketing Platform
Your email platform is the foundation of everything. Choosing the wrong one creates problems as your list scales, so it is worth getting right from the start.
What to Look for in an Email Platform
You need a platform that handles four things well: subscriber storage, email delivery, automation, and opt-in form creation. Most beginner-friendly platforms cover all four, but they differ significantly in pricing, automation depth, and ease of use.
| Platform | Free Plan | Paid Starts At | Best For |
| Mailchimp | Up to 500 contacts | $13/month | Beginners, simple newsletters |
| ConvertKit | Up to 1,000 contacts | $25/month | Creators, bloggers |
| MailerLite | Up to 1,000 contacts | $9/month | Budget-conscious beginners |
| ActiveCampaign | No free plan | $15/month | Advanced automation |
| GetResponse | Up to 500 contacts | $15.58/month | All-in-one marketing |
For most people starting from zero, MailerLite or ConvertKit offer the best balance of features and cost. Both platforms include automation, landing pages, and clean opt-in form builders without requiring a paid plan until you reach a meaningful list size.
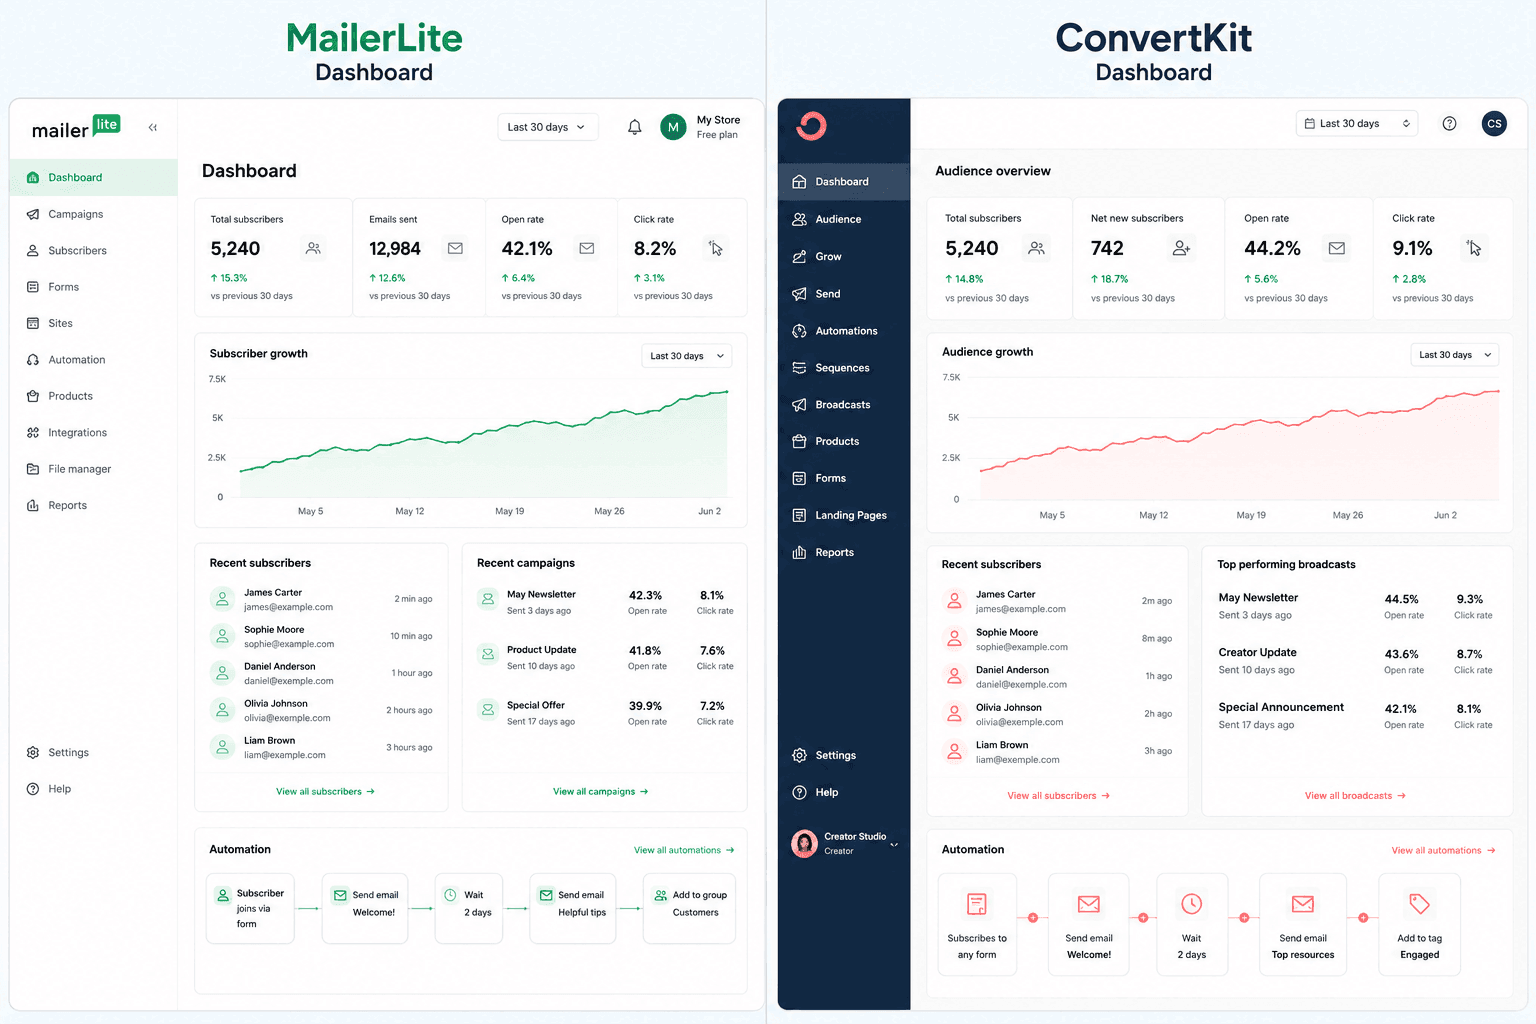
Once you pick a platform, connect it to your website. If you are on WordPress, each major platform has a dedicated plugin or native integration. Set up your account, verify your sending domain, and confirm your sender name and reply-to email before collecting a single subscriber. If you run into plugin conflicts during setup, our guide on Plugin Conflicts: How to Find and Resolve Compatibility Issues will help you troubleshoot quickly.
Key takeaway: Pick a platform that includes automation and landing pages. Start free, but choose one that scales without forcing a painful migration later.
Step 2: Create a Lead Magnet That Actually Gets Signups
The biggest mistake people make when trying to build email subscribers is asking visitors to sign up for “updates” or a “newsletter.” That pitch almost never works. Visitors need a reason to give you their email address, and that reason is a lead magnet.
A lead magnet is a free resource you offer in exchange for an email address. The stronger the lead magnet, the higher your opt-in rate.
What Makes a Lead Magnet Work
A good lead magnet solves one specific problem for one specific person. It is not a broad ebook on a huge topic. It is a focused resource that delivers immediate, tangible value.
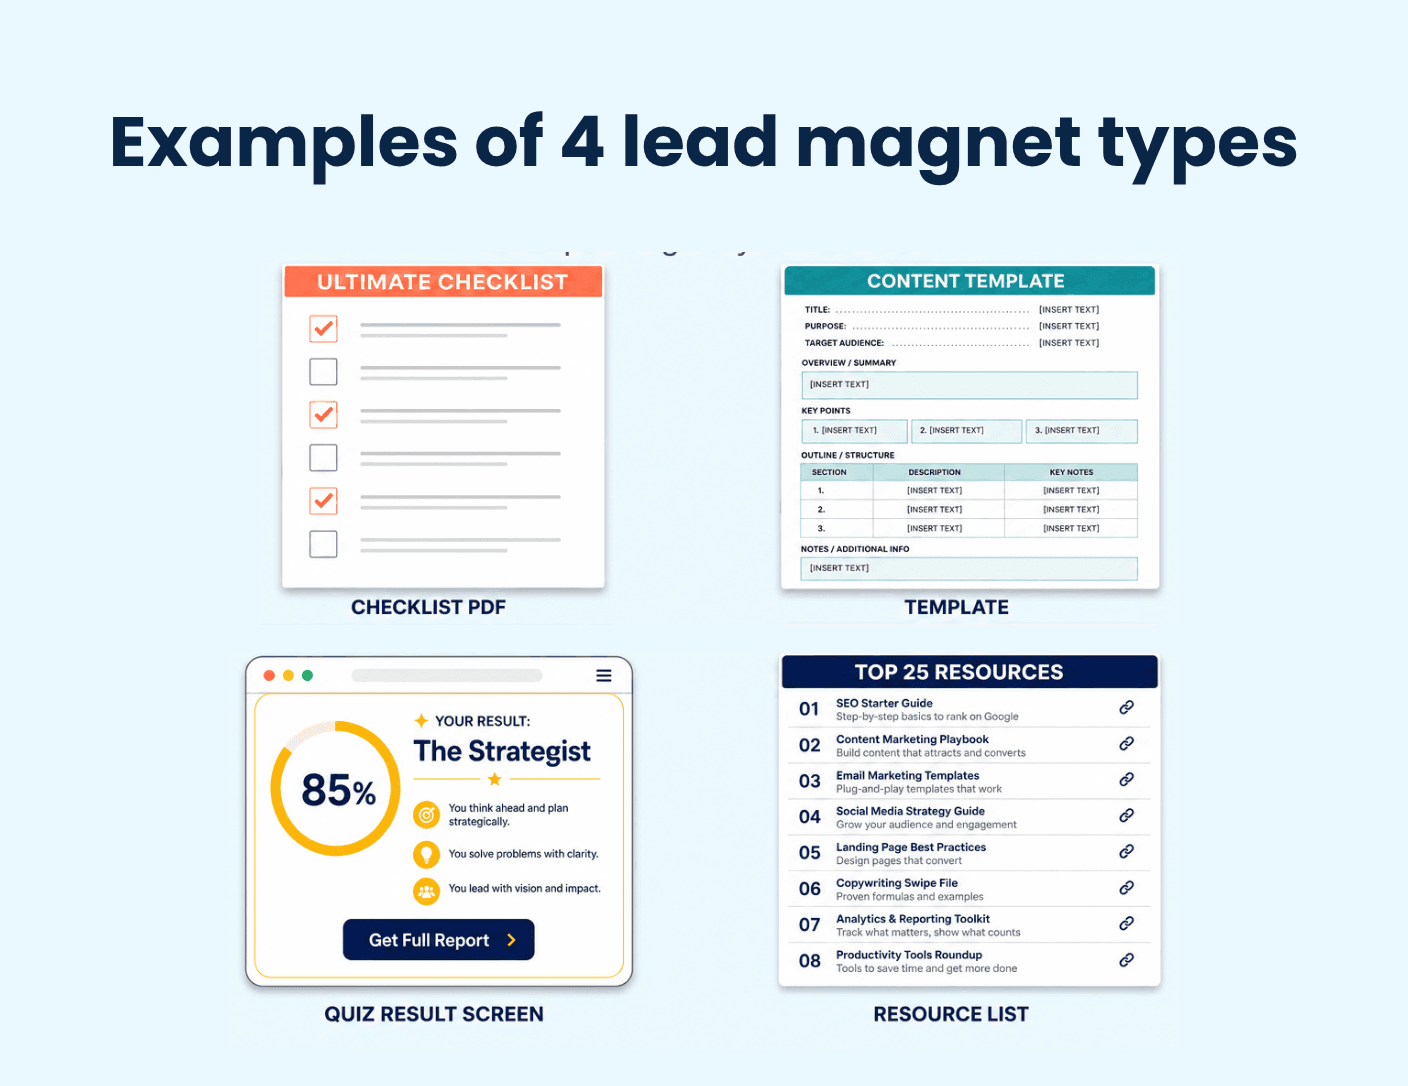
High-converting lead magnet formats include:
- Checklists: Fast to create, easy to consume. A “10-Step Pre-Launch Checklist for Online Stores” can convert at 30% or higher on relevant traffic.
- Templates: Give people something they can copy and use immediately. Examples include email scripts, content calendars, or budget spreadsheets.
- Mini-courses: A 3 to 5 email sequence teaching one skill. Slightly more effort to create but builds trust fast.
- Quizzes: Interactive formats consistently outperform static ones. A quiz that diagnoses a problem and delivers a custom result can double opt-in rates.
- Resource lists: A curated list of tools, books, or links saves your audience research time and positions you as an expert.
The key is alignment. Your lead magnet should be directly connected to what your business sells or the topic your blog covers. If you run a fitness coaching site, offer a free 7-day meal plan, not a generic productivity guide.
For a deeper look at creating lead magnets that convert, read our guide on Lead Magnet Ideas: Create Opt-In Offers That People Want.
Key takeaway: Your lead magnet needs to solve one specific problem for your ideal subscriber. Generic offers produce generic results.
Step 3: Design Opt-In Forms That Convert Visitors Into Subscribers
You can have the best lead magnet in the world and still fail to grow your email list if your opt-in forms are poorly placed or poorly written. Placement and messaging matter as much as the offer itself.
Where to Place Opt-In Forms on Your Website
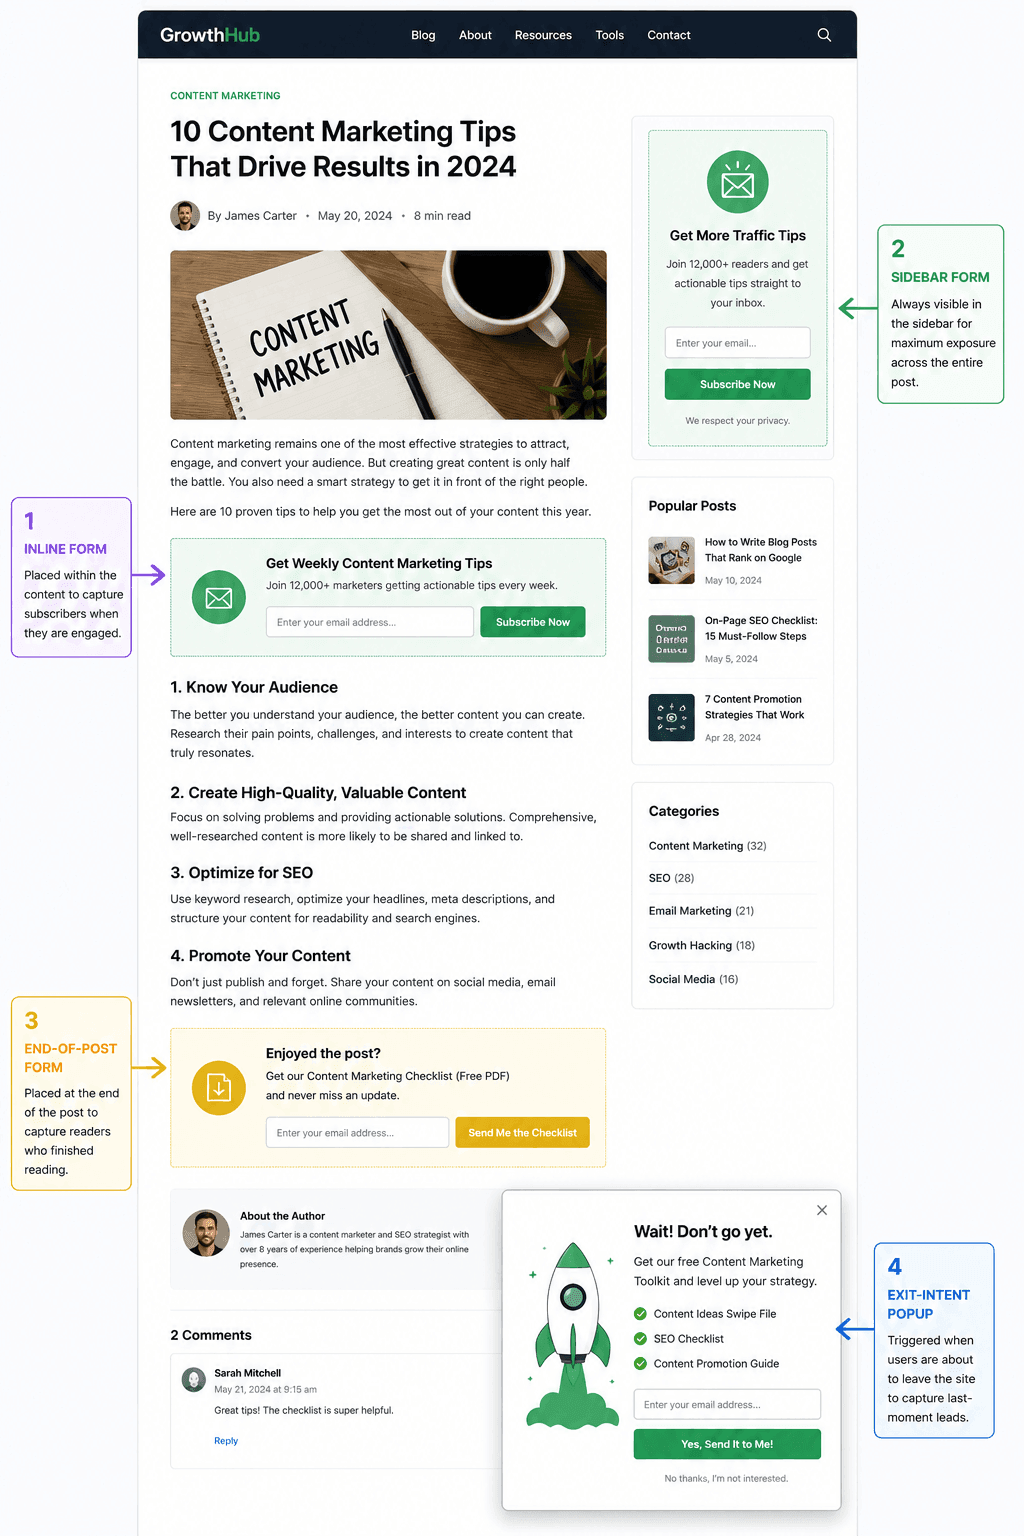
The most effective opt-in form placements are:
- Inline within blog posts: Embedded after the second or third paragraph, or at the halfway point of long articles. These perform well because the reader is already engaged.
- End of blog posts: Readers who finish an article are your most engaged visitors. A clear call to action here converts consistently.
- Dedicated landing pages: A standalone page with no navigation menu, focused entirely on one opt-in offer. These pages can convert at 20% to 40% when well-designed.
- Exit-intent popups: Triggered when a visitor moves their cursor toward closing the tab. Used correctly, these recover 5% to 15% of visitors who would otherwise leave without subscribing.
- Header or sticky bar: A thin bar at the top of every page keeps the offer visible without interrupting the reading experience.
Writing Opt-In Copy That Gets Clicks
Most opt-in forms underperform because of vague copy. “Subscribe to my newsletter” is not a value proposition. Instead, write a copy that answers one question: “What will I get and why does it matter to me?”
Compare these two approaches:
- Weak: “Sign up for my newsletter”
- Strong: “Get the free 10-step checklist that helped 3,200 online store owners prepare for launch”
The stronger version includes a specific deliverable, social proof (3,200 people), and a clear benefit. That combination produces dramatically better conversion rates.
Building credibility around your signup forms matters too. Adding a line like “No spam, unsubscribe anytime” or displaying subscriber counts reduces hesitation. For more on this, visit our article on Trust Signals for Websites: Build Credibility That Converts.
Key takeaway: Place opt-in forms where engagement is highest and write a copy that names the specific benefit. Vague calls to action produce vague results.
Step 4: Build a Landing Page That Turns Traffic Into Subscribers
For campaigns, ads, or high-value lead magnets, a dedicated landing page outperforms embedding an opt-in form on a regular blog post. A landing page removes distractions (no menu, no sidebar, no other links) and focuses the visitor on one action: subscribing.
Elements of a High-Converting Opt-In Landing Page
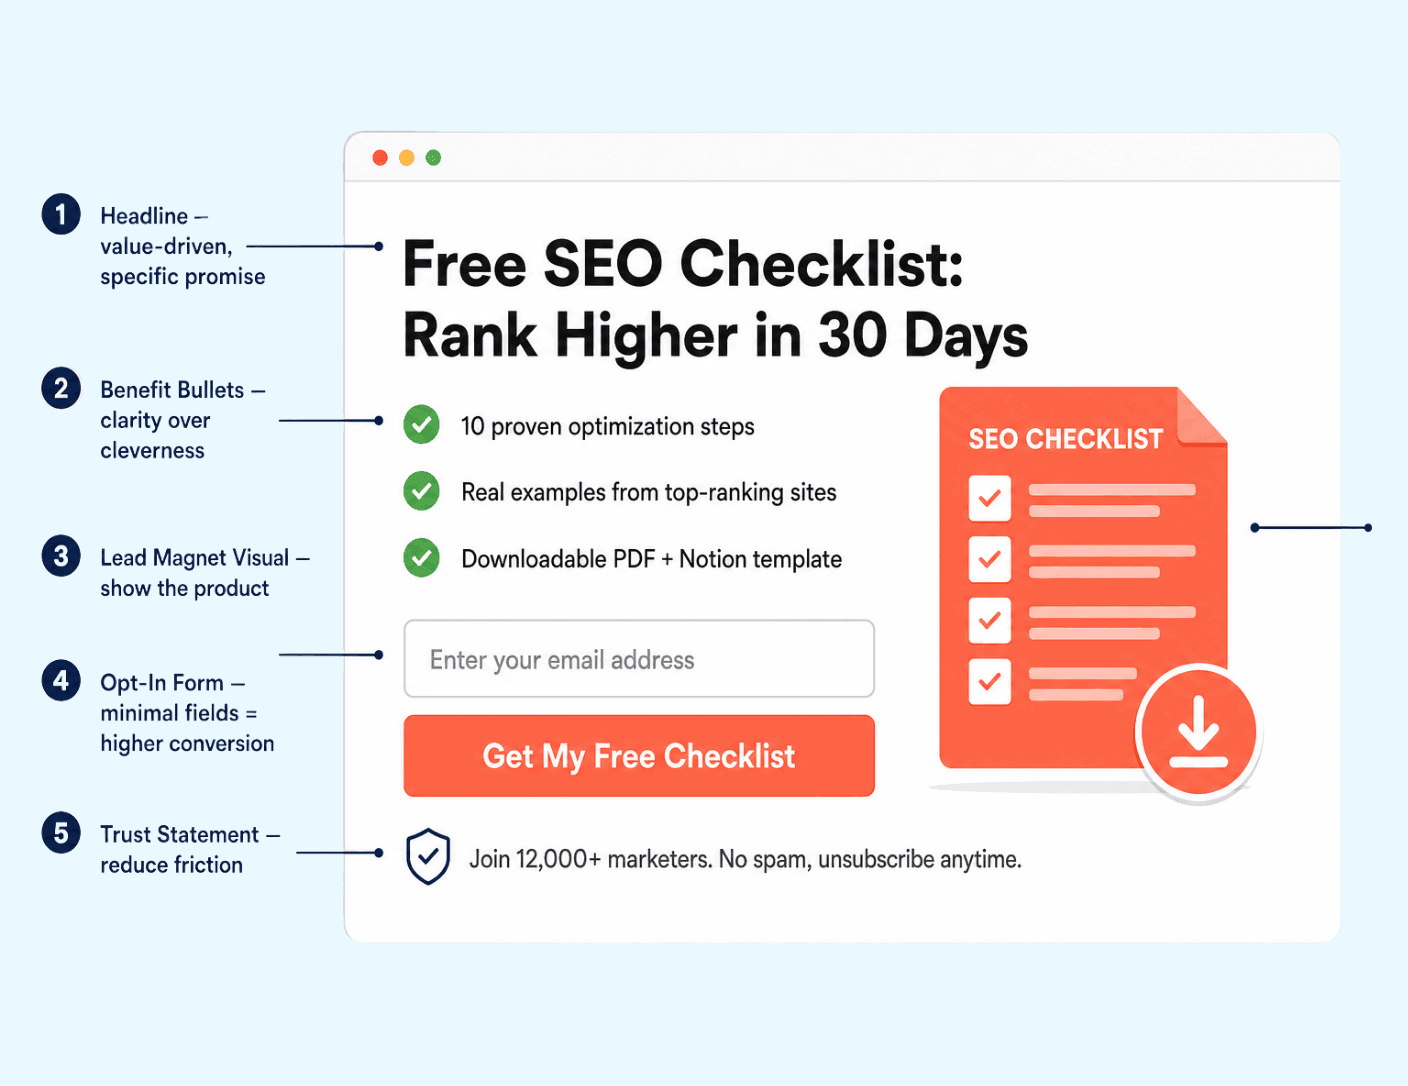
Every effective opt-in landing page includes five core elements. Each one plays a specific role in moving the visitor toward clicking “subscribe.”
- A clear headline that states the benefit of the lead magnet
- A short description (2 to 3 bullet points) explaining exactly what the visitor gets
- A visual mockup of the lead magnet (even a PDF can be displayed as a 3D cover image)
- A simple form with name and email fields only. Every extra field reduces conversions.
- Trust indicators such as a privacy statement, subscriber count, or short testimonial
Most email platforms (MailerLite, Kit.com, GetResponse) include built-in landing page builders. You do not need a separate website page or coding knowledge. You can build and publish a landing page in under an hour.
If you use a scheduling tool or booking form on the same page to qualify leads, our guide on Booking and Scheduling Tools: Set Up Appointments Without Code covers how to embed those without breaking your page layout.
Key takeaway: Landing pages convert better than regular site pages because they remove every distraction. Use your email platform’s built-in builder to launch one quickly.
Step 5: Drive Consistent Traffic to Your Opt-In Offers
A great lead magnet and opt-in form only work if people see them. Traffic is the fuel for list growth, and you do not need a massive audience to start. You need targeted traffic: visitors who are already interested in what you offer.
Using SEO and Blog Content to Grow Your Email List
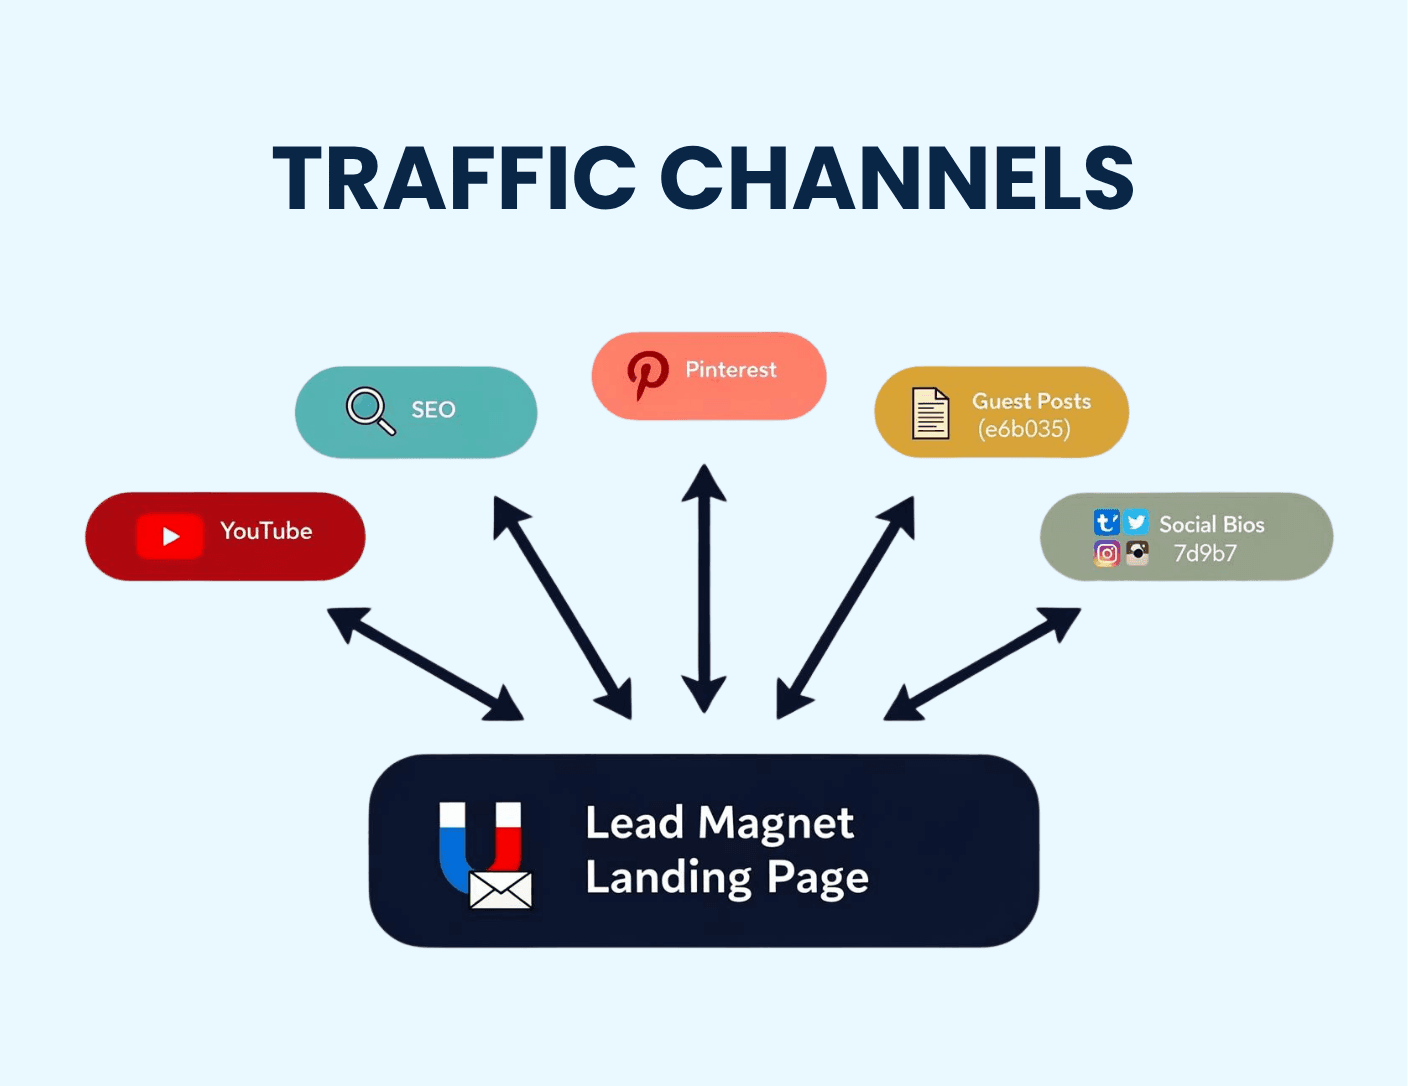
Search engine optimization is one of the most sustainable traffic sources for email list building. When your content ranks on Google, you receive consistent free traffic every day without paying for ads or posting on social media constantly.
The strategy is simple: write blog posts targeting keywords your ideal subscriber searches for. Include your opt-in offer naturally within those posts. Every article becomes a passive subscriber-generating asset.
For example, if you run a personal finance blog, a post ranking for “how to create a monthly budget” can include an inline opt-in offering a free budget spreadsheet template. Every visitor who finds that article through Google is a pre-qualified subscriber prospect.
To build a full SEO and content strategy around your email list growth, our WordPress SEO Guide: Complete Optimization Strategy for Business Sites walks through the complete process.
Other Reliable Traffic Sources for List Growth
Beyond SEO, these channels consistently deliver engaged subscribers:
- Pinterest: Highly effective for visual niches (food, design, lifestyle, business). Pins drive long-term traffic similar to SEO.
- Guest posting: Write for larger publications in your niche and include a link to your lead magnet landing page in your author bio.
- YouTube: Video descriptions and end screens are ideal places to link to your lead magnet.
- Social media profiles: Update your bio links on Instagram, LinkedIn, and Twitter to point directly to your opt-in landing page instead of your homepage.
Key takeaway: You do not need thousands of visitors to grow your email list. You need the right visitors. SEO and targeted content bring people who are already interested in what you offer.
Step 6: Set Up Your Welcome Sequence to Convert New Subscribers
Getting someone to subscribe is the beginning, not the end. What you send them in the first 7 days determines whether they become loyal readers, buyers, or people who forget why they signed up and unsubscribe.
A welcome sequence is a short series of automated emails (3 to 5 emails) sent to every new subscriber. It introduces you, delivers the lead magnet, establishes what to expect from your emails, and moves them toward a first action, such as reading a key article, following you on social media, or purchasing an entry-level product.
A Simple 5-Email Welcome Sequence Structure
- Email 1 (Immediate): Deliver the lead magnet. Include a warm welcome and one sentence about who you are.
- Email 2 (Day 2): Share your best piece of content, whether that is your most popular blog post or a short story about why you started your business.
- Email 3 (Day 4): Address a common problem your audience faces. Offer practical advice with no pitch.
- Email 4 (Day 6): Introduce your paid offer, product, or service. Keep it soft. Explain how it helps, not what it costs.
- Email 5 (Day 8): Ask a question. “What is your biggest challenge with [topic]?” Reply data from this email is invaluable for future content decisions.
Every major email platform lets you set up this automation in under two hours. Once it is live, it runs automatically for every new subscriber going forward.
Key takeaway: Automate your welcome sequence before you drive traffic. New subscribers are most engaged in the first 48 hours. Missing that window wastes your best conversion opportunity.
Step 7: Keep Your List Healthy as It Grows
A large email list means nothing if subscribers are not opening your emails. Deliverability, which is the ability of your emails to reach inboxes rather than spam folders, depends heavily on list health.
As your list grows, keep it clean with these practices:
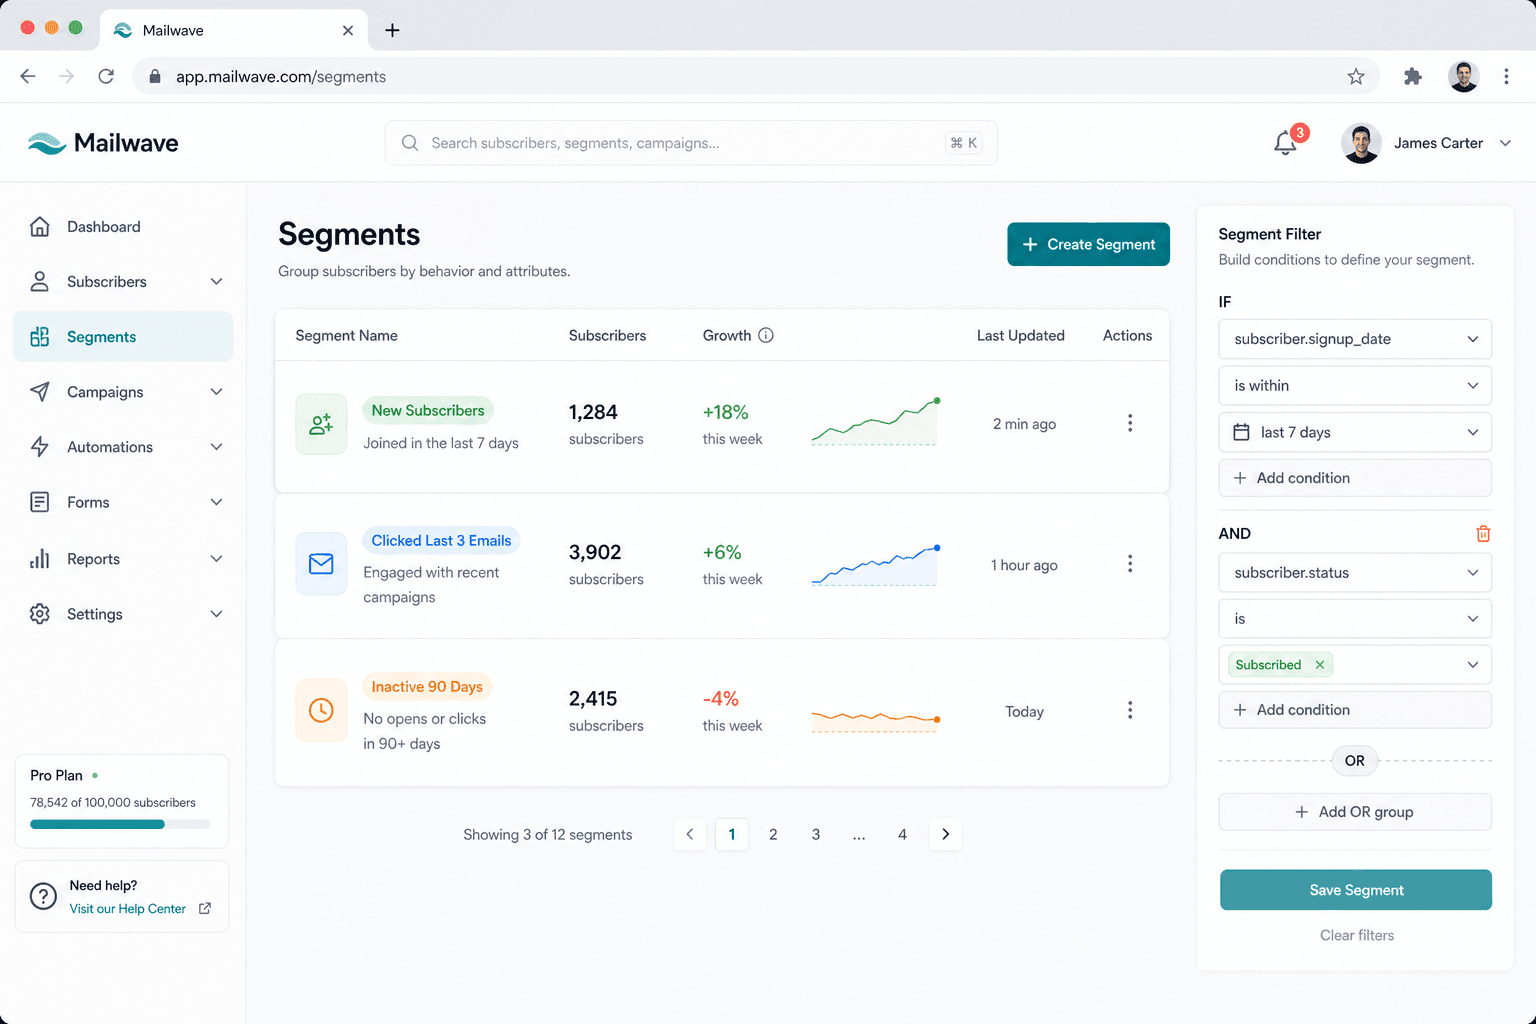
- Remove inactive subscribers every 90 days. Anyone who has not opened an email in 90 days should receive a re-engagement email first. If they still do not respond, remove them.
- Segment your list. Group subscribers by interest, behavior, or signup source. Segmented emails generate 58% higher click-through rates than unsegmented broadcasts, according to Mailchimp data.
- Use double opt-in for cold or paid traffic. Double opt-in requires the subscriber to confirm their email address before being added. It reduces list size slightly but dramatically improves quality and deliverability.
- Track your open and click rates. A healthy open rate sits between 20% and 35% depending on your niche. If yours drops below 15%, review your subject lines, sending frequency, or content relevance.
Protecting your WordPress account and subscriber data is also part of healthy list management. Our guide on Two-Factor Authentication for WordPress: Set Up 2FA the Right Way walks through securing your site so your list data stays protected.
Key takeaway: List size is a vanity metric. List quality determines your revenue. A clean, segmented list of 2,000 engaged subscribers will consistently outperform a bloated, unmanaged list of 10,000.
Frequently Asked Questions
What to Do Next
Building an email list is not a one-day project, but it does not have to be complicated. Here are four concrete steps to take this week.
Step 1: Choose your email platform today. Do not spend three weeks comparing options. Pick MailerLite or ConvertKit, create a free account, and connect it to your website. Your infrastructure needs to be in place before anything else can happen.
Step 2: Create your first lead magnet this week. Start simple. A one-page checklist or short resource list can be created in a few hours using a free Canva template. Read Lead Magnet Ideas: Create Opt-In Offers That People Want to find the right format for your specific audience.
Step 3: Set up at least two opt-in form placements. Add an inline form to your top-performing blog post and a popup or sticky bar to your homepage. Then create a simple landing page using your email platform’s builder and update your social media bio links to point to it.
Step 4: Write your 5-email welcome sequence before driving traffic. Set up your automation now so every new subscriber gets a consistent, high-quality experience from day one. Once your sequence is live, focus on SEO-driven traffic. Our WordPress SEO Guide: Complete Optimization Strategy for Business Sites will help you build that foundation. And if you are thinking long-term about the value of your growing list as a business asset, our guide on Exit Strategy Planning: Build a Business Worth Selling shows how a strong subscriber base increases what your business is worth.

